Remote working due to coronavirus? Harden Home Security with OpenWrt
Having a secure network is becoming a real necessity with the recent pandemic outbreak of the coronavirus when a large portion of the population has to work remotely and securely from home. Especially for this purpose, it’s becoming a real necessity building a very low-cost firewall device for both indoors and outdoor usage.
OpenWrt is a Linux operating system targeting embedded devices. It’s an open software-based solution that is totally free and easy to configure, even for non-geeks. If you already have a router that already was OpenWrt pre-installed, it will make things a lot more simple.
With an OpenWrt device, you can configure your firewall, VPN accounts, block advertisements, block external hacking and malware attacks, and much more. For SBC (Single-board computers) users its highly recommend buying a cheap board based on a low power based on the Allwinner SoC, such as the NanoPi R2S that features a pair of ethernet ports and is very compact in size. You can burn the FriendlyWrt (OpenWrt) image on a Micro-SD card and update it online or install newer images.
Buying an SBC has a lot of advantages. It can be carried in a suitcase or even a small pocket and use it anywhere while traveling abroad. On top of that, it can be used as a gateway device to bridge between your desktop computer and your existing router, adding an extra layer of security when working on untrusted local networks. In this short tutorial, we will be configuring Ivacy’s VPN service to run OpenVPN through OpenWrt installed on a router.
Main Specifications
- Model Number: WR330
- Software: OpenWrt 18.06 FW
- Standard: IEEE 802.11 b/g/n/ac
- Antenna: 2 x 3dBi Fixed Antenna
- External Storage support: 1 x USB
- Fast Ethernet: 4 Gigabit Ethernet ports.
-
CPU: MTK MT7621A 880MHz+MT7603E+MT7612E
- Memory & Storage: DDR3 128MB, FLASH 16MB
Data rate:
- 2.4GHz 802.11n up to 300 Mbps
- 5GHz 802.11 as up to 867 Mbps
- RJ45 for 10/100/1000/Gigabits BaseT for WAN x 1
- RJ45 for 10/100/1000/Gigabits BaseT for LAN x 4
- USB2.0 x 1
- Power input x 1
- Reset button x 1
- WPS x 1

Method 1
Configuring Ivacy VPN Service through CLI
(Command-line Setup).
Connecting to the Router via SSH Connection
Download puTTY from here: Click Here
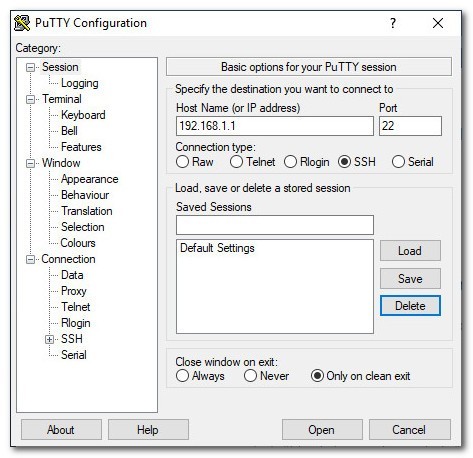
Launch puTTY,
Host Name: your router’s IP (192.168.1.1 unless you changed it)
Port: 22
Connection type: SSH
Click “Open”
login as: “root”
enter your router’s password
Updating the package repository & installing OpenVPN
root@OpenWrt:~# opkg update
root@OpenWrt:~# opkg install package
Packages to install:
6in4 luci-proto-ipv6
openvpn-easy-rsa
luci-app-openvpn
install openvpn-openssl
install ip-full
Creating the interface configuration file
Interface configuration:
root@OpenWrt:~# cat >> /etc/config/network << EOF
config interface ‘Ivacy’
option ifname ‘eth0’
option proto ‘none’
EOF
Creating an Authentication Login file
Adding username & password:
root@OpenWrt:~# cat >> /etc/openvpn/userpass.txt << EOF
Your_Ivacy_Username
Your_Ivacy_Password
EOF
Selecting a Server
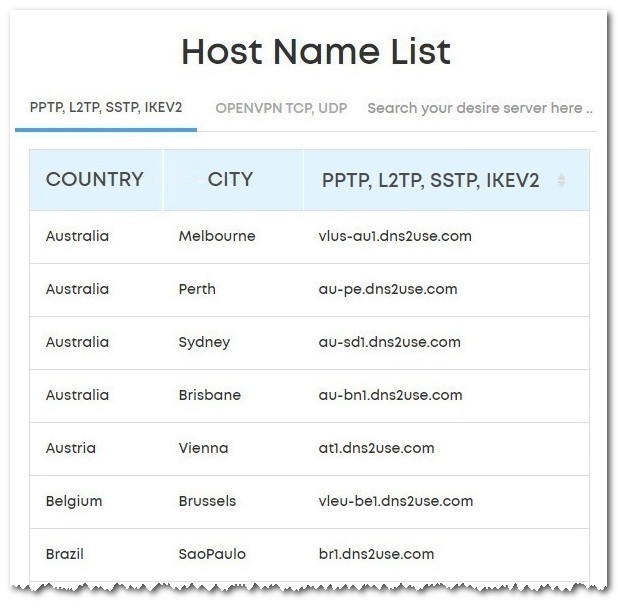
Now you can select a preferred server based on geographic location. You can also use the PING command to pick the best server based on packet transfer speed response, measured in milliseconds. Having said that, There are two types of ports you can pick. UDP and TCP ports, where UDP is the ideal and the best option for streaming applications. If your connection purpose is to unlock Netflix access Its highly recommended picking a server from the following seven regions: US, France, Japan, UK, Australia, Germany & Canada.
- Ivacy Servers list: https://support.ivacy.com/servers-list/
- For this tutorial, we selected server: usil1-ovpn-udp.ivacy.net
Ivacy VPN servers list (A partial list)
Creating an OpenVPN configuration file
root@OpenWrt:~# cat >> /etc/config/openvpn << EOF
config openvpn ‘Ivacy’
option client ‘1’
option dev ‘tun’
option proto ‘udp’
option resolv_retry ‘infinite’
option nobind ‘1’
option persist_key ‘1’
option persist_tun ‘1’
option user ‘nobody’
option ca ‘/etc/openvpn/ca.crt’
option cert ‘/etc/openvpn/client.crt’
option key ‘/etc/openvpn/client.key’
option compress ‘lzo’
option verb ‘3’
list remote ‘usil1-ovpn-udp.ivacy.net’
option port ’53’
option auth_user_pass ‘/etc/openvpn/userpass.txt’
option auth ‘SHA1’
option cipher ‘AES-256-CBC’
option tls_auth ‘/etc/openvpn/Wdc.key’
option tls_client ‘1’
option enabled ‘1’
option dev_type ‘tun’
option float ‘1’
EOF
Creating the CA (Certificate Authority) file
root@OpenWrt:~# cat >> /etc/openvpn/ca.crt << EOF
—–BEGIN CERTIFICATE—–
MIIEnzCCA4egAwIBAgIBAzANBgkqhkiG9w0BAQsFADCBqDELMAkGA1UEBhMCSEsx
EDAOBgNVBAgTB0NlbnRyYWwxCzAJBgNVBAcTAkhLMRgwFgYDVQQKEw9TZWN1cmUt
U2VydmVyQ0ExCzAJBgNVBAsTAklUMRgwFgYDVQQDEw9TZWN1cmUtU2VydmVyQ0Ex
GDAWBgNVBCkTD1NlY3VyZS1TZXJ2ZXJDQTEfMB0GCSqGSIb3DQEJARYQbWFpbEBo
b3N0LmRvbWFpbjAeFw0xNjAxMTUxNjE1MzhaFw0yNjAxMTIxNjE1MzhaMIGdMQsw
CQYDVQQGEwJISzEQMA4GA1UECBMHQ2VudHJhbDELMAkGA1UEBxMCSEsxFjAUBgNV
BAoTDVNlY3VyZS1DbGllbnQxCzAJBgNVBAsTAklUMRYwFAYDVQQDEw1TZWN1cmUt
Q2xpZW50MREwDwYDVQQpEwhjaGFuZ2VtZTEfMB0GCSqGSIb3DQEJARYQbWFpbEBo
b3N0LmRvbWFpbjCBnzANBgkqhkiG9w0BAQEFAAOBjQAwgYkCgYEAxsnyn4v6xxDP
nuDaYS0b9M1N8nxgg7OBPBlK+FWRxdTQ8yxt5U5CZGm7riVp7fya2J2iPZIgmHQE
v/KbxztsHAVlYSfYYlalrnhEL3bDP2tY+N43AwB1k5BrPq2s1pPLT2XG951drDKG
4PUuFHUP1sHzW5oQlfVCmxgIMAP8OYkCAwEAAaOCAV8wggFbMAkGA1UdEwQCMAAw
LQYJYIZIAYb4QgENBCAWHkVhc3ktUlNBIEdlbmVyYXRlZCBDZXJ0aWZpY2F0ZTAd
BgNVHQ4EFgQU9MwUnUDbQKKZKjoeieD2OD5NlAEwgd0GA1UdIwSB1TCB0oAU456i
jsFrYnzHBShLAPpOUqQ+Z2ehga6kgaswgagxCzAJBgNVBAYTAkhLMRAwDgYDVQQI
EwdDZW50cmFsMQswCQYDVQQHEwJISzEYMBYGA1UEChMPU2VjdXJlLVNlcnZlckNB
MQswCQYDVQQLEwJJVDEYMBYGA1UEAxMPU2VjdXJlLVNlcnZlckNBMRgwFgYDVQQp
Ew9TZWN1cmUtU2VydmVyQ0ExHzAdBgkqhkiG9w0BCQEWEG1haWxAaG9zdC5kb21h
aW6CCQDI1xaHqObkpTATBgNVHSUEDDAKBggrBgEFBQcDAjALBgNVHQ8EBAMCB4Aw
DQYJKoZIhvcNAQELBQADggEBAFyFo2VUX/UFixsdPdK9/Yt6mkCWc+XS1xbapGXX
b9U1d+h1iBCIV9odUHgNCXWpz1hR5Uu/OCzaZ0asLE4IFMZlQmJs8sMT0c1tfPPG
W45vxbL0lhqnQ8PNcBH7huNK7VFjUh4szXRKmaQPaM4S91R3L4CaNfVeHfAg7mN2
m9Zn5Gto1Q1/CFMGKu2hxwGEw5p+X1czBWEvg/O09ckx/ggkkI1NcZsNiYQ+6Pz8
DdGGX3+05YwLZu94+O6iIMrzxl/il0eK83g3YPbsOrASARvw6w/8sOnJCK5eOacl
21oww875KisnYdWjHB1FiI+VzQ1/gyoDsL5kPTJVuu2CoG8=
—–END CERTIFICATE—–
EOF
Creating an OpenVPN static key (TLS) file
root@OpenWrt:~# cat >> /etc/openvpn/Wdc.key << EOF
# 2048 bit OpenVPN static key
—–BEGIN OpenVPN Static key V1—–
e30af995f56d07426d9ba1f824730521
d4283db4b4d0cdda9c6e8759a3799dcb
7939b6a5989160c9660de0f6125cbb1f
585b41c074b2fe88ecfcf17eab9a33be
1352379cdf74952b588fb161a93e13df
9135b2b29038231e02d657a6225705e6
868ccb0c384ed11614690a1894bfbeb2
74cebf1fe9c2329bdd5c8a40fe882062
4d2ea7540cd79ab76892db51fc371a3a
c5fc9573afecb3fffe3281e61d72e915
79d9b03d8cbf7909b3aebf4d90850321
ee6b7d0a7846d15c27d8290e031e951e
19438a4654663cad975e138f5bc5af89
c737ad822f27e19057731f41e1e254cc
9c95b7175c622422cde9f1f2cfd3510a
dd94498b4d7133d3729dd214a16b27fb
—–END OpenVPN Static key V1—–
EOF
Starting OpenVPN Service
root@OpenWrt:~# service openvpn start
Method 2
Configuring Ivacy VPN Service through LUCI Web Interface
Installing OpenVPN Client Packages
First, connect to LUCI (the interface on your router) by going through your browser. By default, your router should have the IP address 192.168.1.1.
Login as root using your regular password for the router. Navigate to System → Software and click on Update lists.
Under Download and install package, search for the following packages:
6in4 luci-proto-ipv6
openvpn-easy-rsa
luci-app-openvpn
install openvpn-openssl
install ip-full
Press OK on each of them to download and install them.

Downloading OpenVPN Configuration Files
From Ivacy website listed below:
If you are setting a router / SBC you need to download and extract the following zip file OpenVPN-Configs.zip which contains Openvpn configuration files:
| DD-WRT / Linux / Android / iOS | Click Here to Download File |
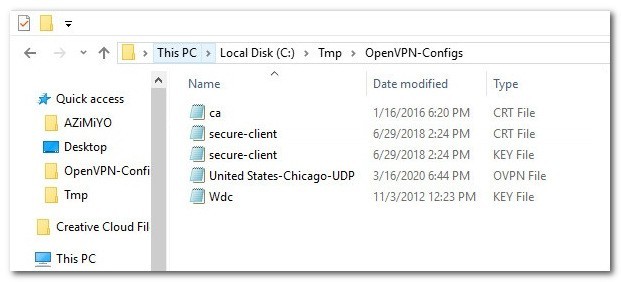
These are the files needed to configure Ivacy VPN:
- ca.crt (Certificate Authority).
- Wdc.key (Secret Key).
- Secure-client.key -> renamed to client.key
- Secure-client.crt -> renamed to client.crt
- United States-Chicago-UDP (server configuration file used as reference).
OpenVPN-Configs.zip content
Creating a login file
SSH with your ROOT account via PuTTY or other SSH clients to your router / SBC IP address: 192.168.1.1
Using “TextPad” or similar create a new text file and put your user-name in the first line and your pass in the second line and save it as “userpass.txt“. Make sure you choose UNIX file format when saving!!
userpass.txt file content:
Your_Ivacy_Username
Your_Ivacy_Password
Connect to the router and upload configuration files:
- Next, download WinSCP from here: Click untrustedopen, softwareHere
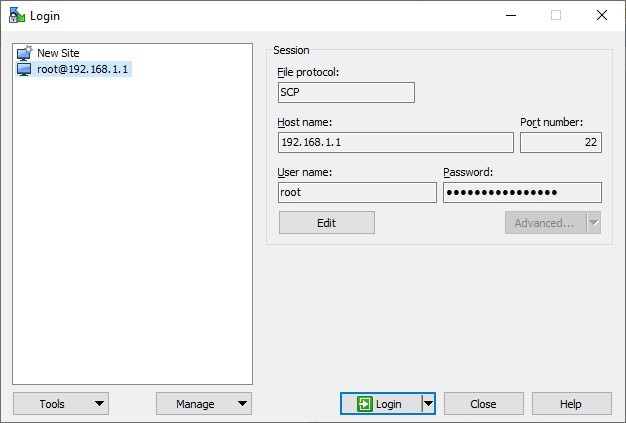
- Launch WinSCP.
Enter the following settings and information:
Hostname: your router’s IP (it’s 192.168.1.1 unless you changed it)
Port number: 22
User Name: root
Password: your password to your router
Private key file: just leave it blank
File protocol: SCP
Click “Login” (Ignore the error about user groups.)
3. Using WinSCP transfer your files to /etc/openvpn directory of your router.
- ca.crt
- client.crt
- client.key
- userpass.txt
Configuring OpenVPN Client
Configuration category: Services
Navigate to Configuration category: Service
Type the name of the OpenVPN instance (e.g. Ivacy). Select Client configuration for a router multi-client VPN and click Add.
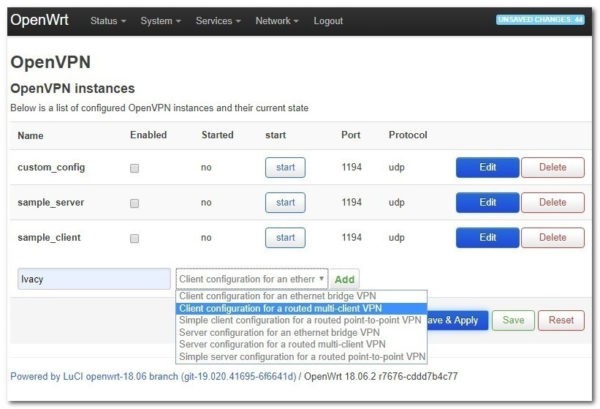
Finally, Click on the Save button.
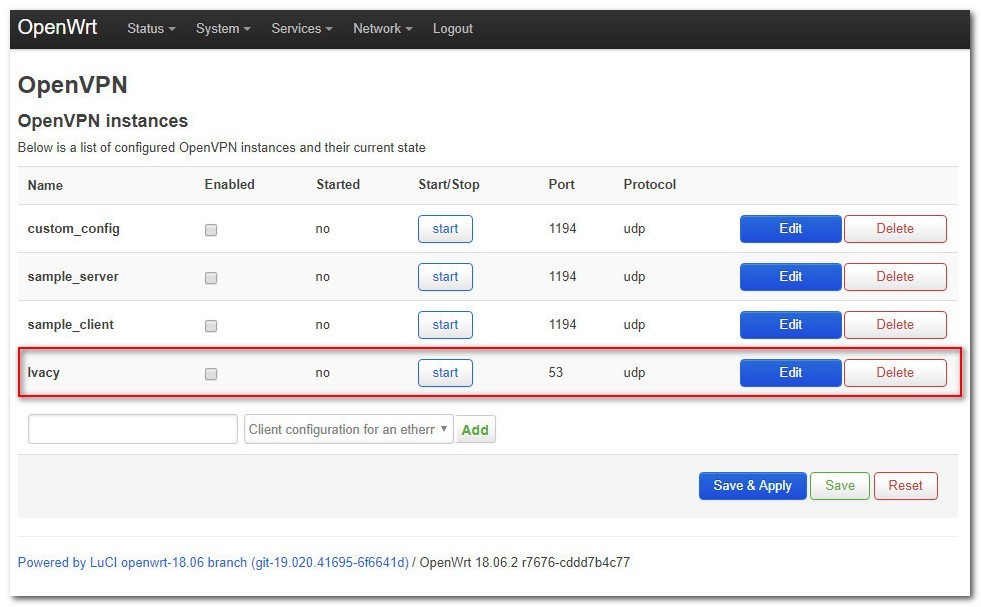
Click on the Edit button next to the Ivacy client name you just created.
Next, click on the dropdown that says ‘— Additional Field–‘ at the bottom and add the following options listed in the table below:
| verb | 3 |
| port | 53 |
| dev_type | tun |
| nobind | Should be selected |
| client | Should be selected |
| remote | usil1-ovpn-udp.ivacy.net |
| ca | /etc/openvpn/ca.crt |
| cert | /etc/openvpn/client.crt |
| key | /etc/openvpn/client.key |
| proto | udp |
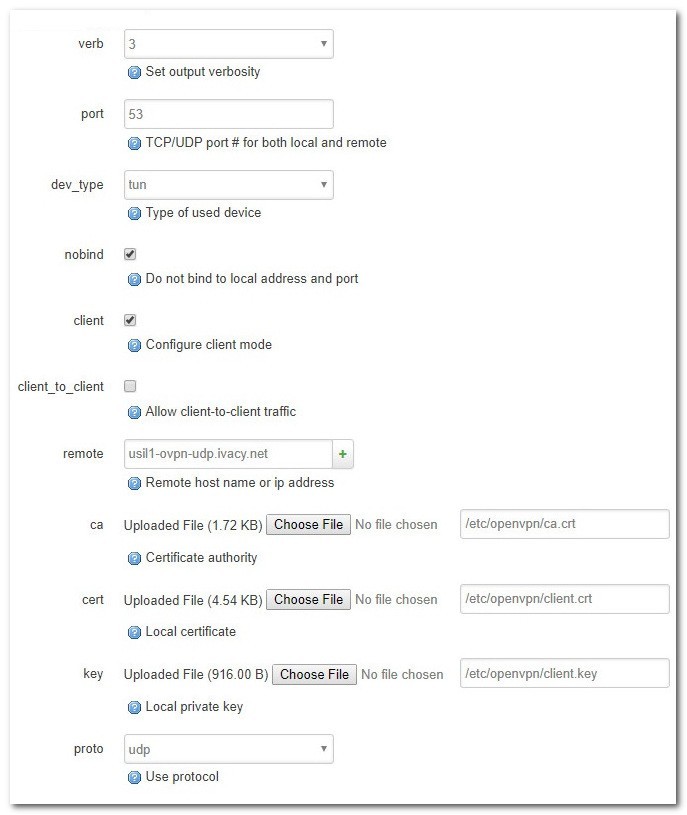
Finally, Click on the Save button.
- Next, click on Switch to advanced configuration. Note the new default main subcategory of menu items will be Service.
- Uploading OpenVPN Configuration Files: Point each file in the folder one by one where you extracted the OpenVPN-Configs.zip.
Make sure the settings are as followed:
| verb | 3 |
| mlock | Should not be selected |
| disable_occ | Should not be selected |
| passtos | Should not be selected |
| suppress_timestamps | Should not be selected |
| fast_io | Should not be selected |
| down_pre |
Should not be selected |
| up_restart | Should not be selected |
| client_disconnect | Should not be selected |
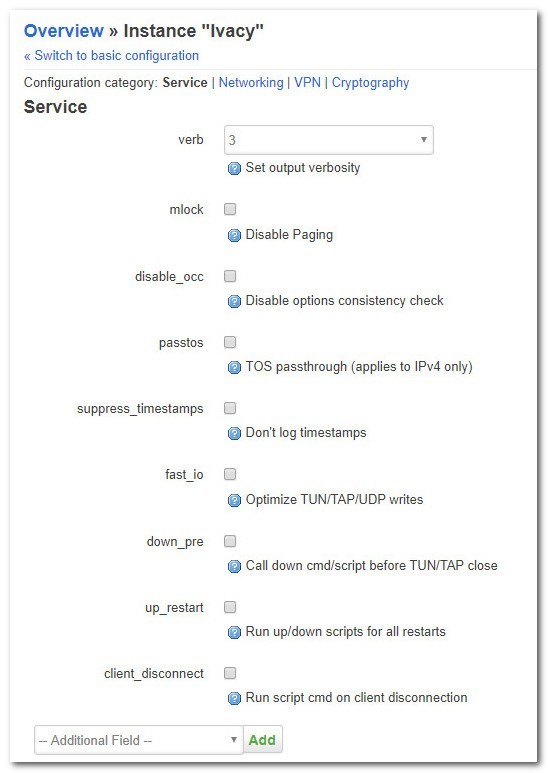
Finally, Click on the Save button.
Configuration category: Networking
- Click on the dropdown that says ‘— Additional Field–‘ at the bottom of the page and add the following settings:
| port | 53 |
| dev | tun |
| dev_type | tun |
| nobind | Should be selected |
| float | Should be selected |
| persiste-key | Should be selected |
| persiste-tun | Should be selected |
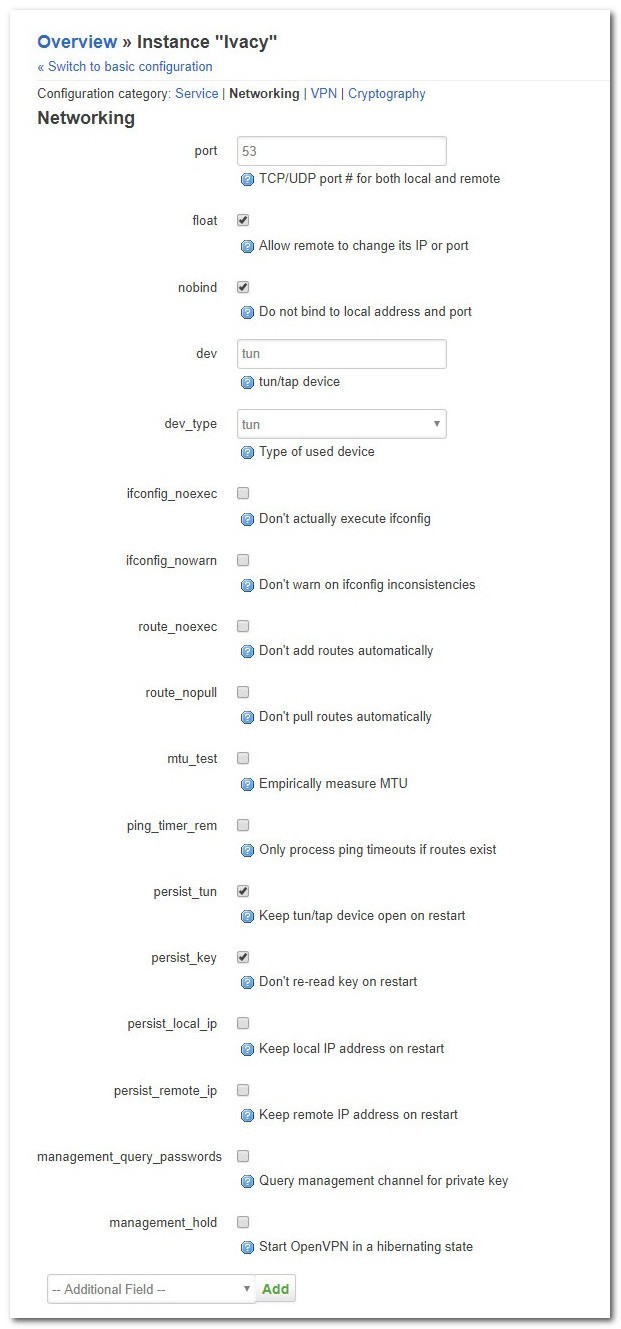
Finally, Click on the Save button.
Configuration category: VPN
- Click on the dropdown that says ‘— Additional Field–‘ at the bottom of the page. Select ‘auth_user_pass’ and click on ‘Add’.
| Client | Should be selected |
| auth_user_pass | /etc/openvpn/userpass.txt |
| remote | usil1-ovpn-udp.ivacy.net |
| remote_random | Should not be selected |
| proto | udp |
| http_proxy_retry | Should not be selected |
| resolv_retry | infinite |
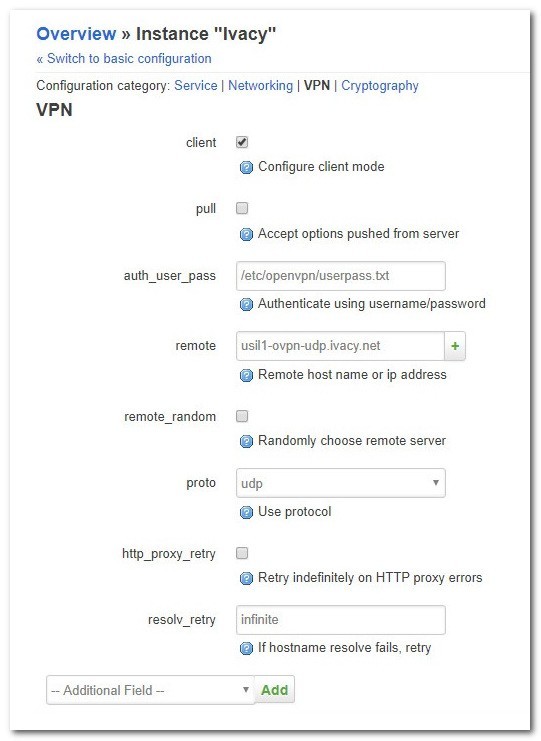
Finally, Click on the Save button.
Configuration category: Cryptography
Click on the dropdown that says — Additional Field– at the bottom of the page. Make sure the settings are as followed:
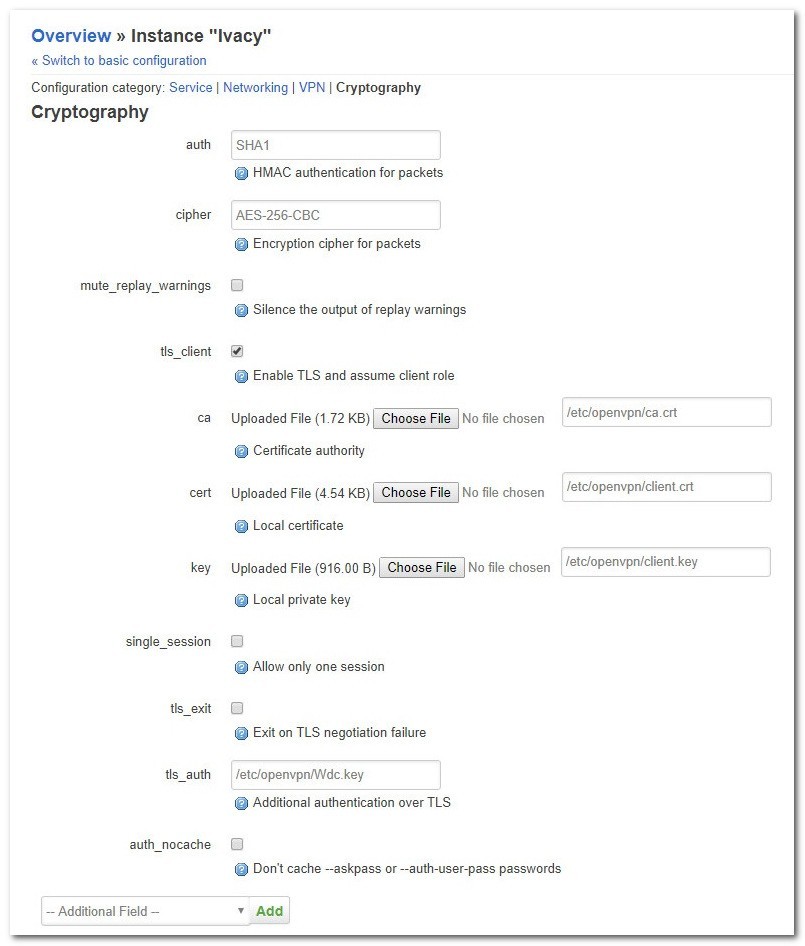
Finally, Click on the Save & Apply button.
Configure the interface
Navigate to Networking → Interfaces. Click on Add new interface.
Make sure the settings are as followed:
| Name of the new interface | Ivacy |
| The protocol of the new interface | Unmanaged |
| Cover the following interface | Custom interface: tun |
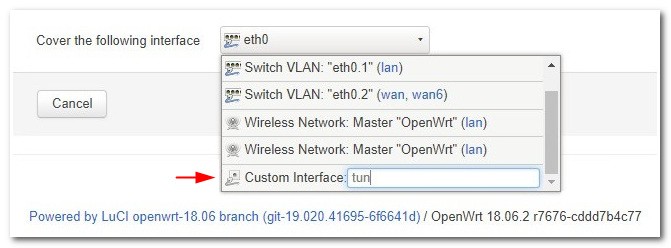
The final result:
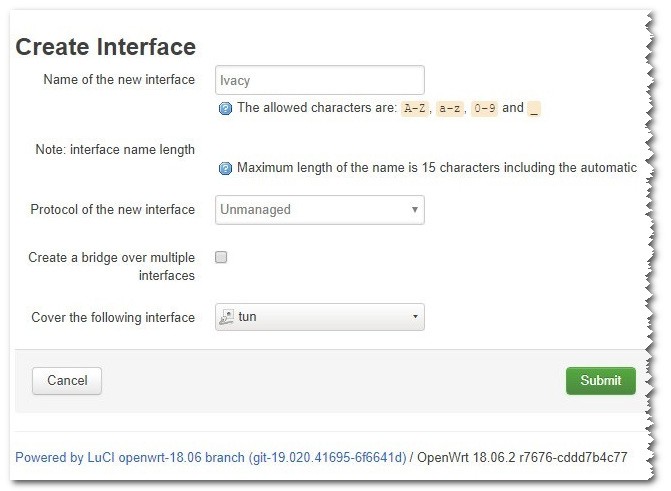
Finally, Click Submit
Next, Navigate to Advanced Settings. Make sure the settings are as followed:
| Bring up on boot | Should be selected |
| Use builtin IPv6-management | Should be selected |
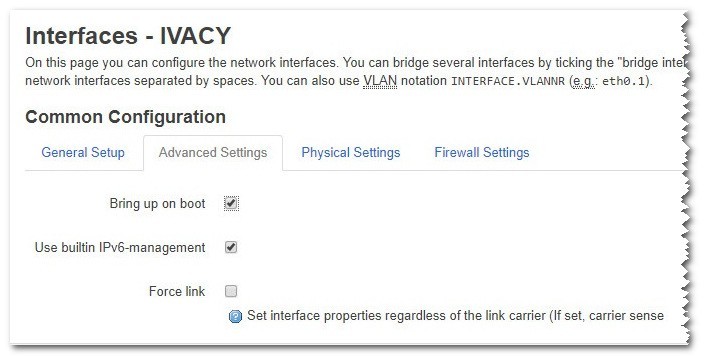
Click on the Save & Apply button
Next, Navigate to Firewall Settings.
In the field unspecified -or- create a field, write: ovpn_fw and press the enter key.
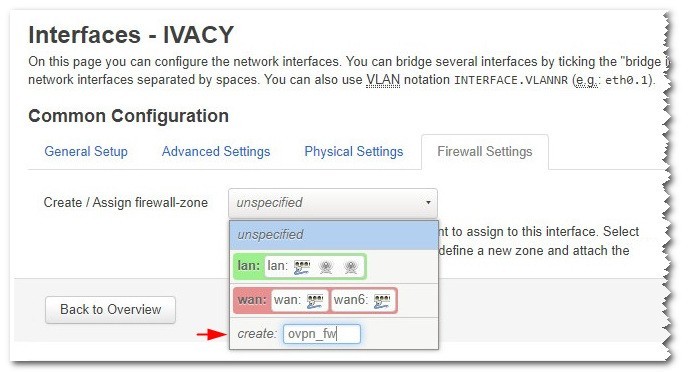
Finally, Click on the Save & Apply button.
Configure the firewall
Navigate to Networking → Firewall. Find ovpn_fw in the list of interfaces and click on Edit.
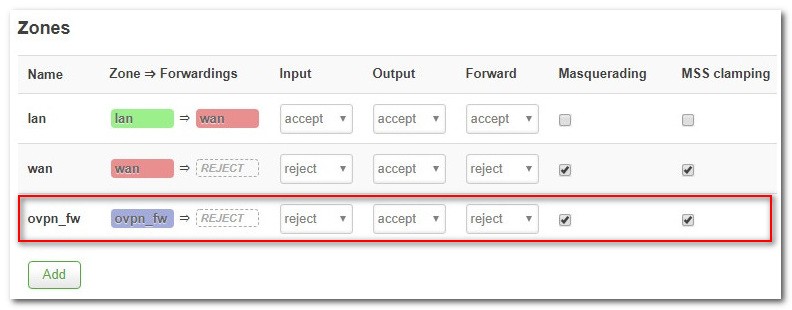
Make sure the following settings are applied:
| Input | reject |
| Output | accept |
| Forward | reject |
| Masquerading | Should be selected |
| MSS clamping | Should be selected |
Click on the Save & Apply button.
Scroll down to Inter-Zone Forwarding. Select Allow forward from source zones: lan
| Covered networks | Should be selected Ivacy |
| Allow forward from source | lan |
| Forward | reject |
Finally, Click on the Save & Apply button.
Connect to Ivacy
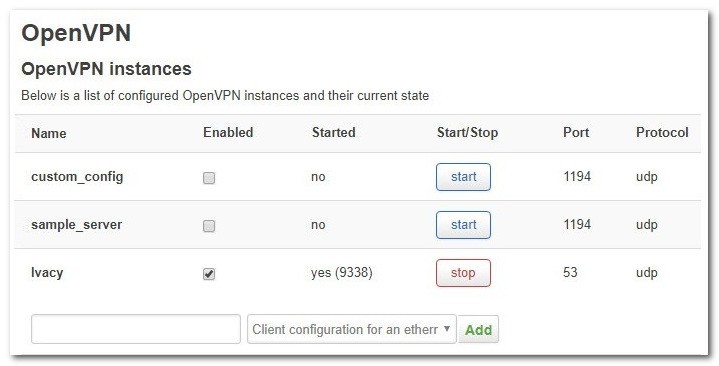
Go back to LUCI (the interface on your router) by going through your browser. Navigate to Services → OpenVPN.
Make sure Enabled is selected for the OVPN profile and then click on Save & Apply. Click Start.
After a few seconds, a connection should be established. If you successfully connected to the server, you should see the following:
Ivacy VPN Service
Ivacy VPN service offers a very reasonable value for the buck plans, as well as good and intuitive software clients across all mobile devices, including browser add-ons for chrome and firefox. If you are searching for a low-cost VPN to access Netflix, Ivacy service is one of the cheapest VPN providers out there worth considering.
[wptb id="55611" not found ]


